In this article, We are going to discuss about how to implement a stripe checkout page using Stripe Elements instead of Stripe Checkout. When to use them, How to use them & Which use cases are suitable for different requirements.
This article contains, Code with demos, So that, It becomes easier to learn and implement at the same time.
What is Stripe?
Millions of businesses of all sizes—from startups to large enterprises—use Stripe’s software and APIs to accept payments, send payouts, and manage their businesses online.
https://stripe.com
Stripe Elements:
Stripe Elements is a set of prebuilt UI components, like inputs and buttons, for building your checkout flow.
It is available as a feature of Stripe.js. So, It tokenizes the sensitive information within an Element without ever having it touch your server, Which makes it even more secure.
Stripe Elements includes features as given below:
- Formatting card information automatically as it’s entered
- Translating placeholders into your customer’s preferred language
- Using responsive design to fit the width of your customer’s screen or mobile device
- Customizing the styling to match the look and feel of your checkout flow
To build custom payment forms:
In order to build custom payment forms, The primary integration path through Stripe.js is with Stripe Elements, which enables you to collect sensitive payment information using customizable UI components.
Stripe.js also provides a single interface for Apple Pay, Google Pay, and the Payment Request API.
1. Card Element
The Card Element lets you collect card information all within one Element. It includes a dynamically-updating card brand icon as well as inputs for number, expiry, CVC, and postal code,
Get started with accepting a payment.
It is advised to use Stripe.js to remain PCI compliant by ensuring that card details are sent directly to Stripe without hitting your server to make it more secured.
To remain compliant, Always load Stripe.js from js.stripe.com. It is advised not to include the script in a bundle or to host it by yourself.
Following is the running demo with code to explore and play with.
Pen: https://codepen.io/sarkazein7/pen/rNWJvXd

Setup Card Element (Client Side)
Elements is available as part of Stripe.js. So, Include this in your page and create a container so that it can be used for the card Element:
<script src="https://js.stripe.com/v3/"></script>
<div id="card">
  <!-- A Stripe Card Element will be inserted here. -->
</div>
Your Stripe publishable API key is also required as it identifies your website to Stripe:
const stripe = Stripe('pk_test_TYooMQauvdEDq54NiTphI7jx', {
  apiVersion: "2020-08-27",
});
Create Styled Card Element
Here, Initially, We are creating the reference to stripe API, So that We can use it to access the Stripe API.
After that, We created the reference of stripe elements and stored in inside elements variable, By using that we will create the instance of Stripe Card Element.
And Finally, We have created the card element, where we have passed, id of the element & style to customize the look and feel of the element.
const stripe = Stripe('pk_test_TYooMQauvdEDq54NiTphI7jx', {
  apiVersion: "2020-08-27",
});

  var elements = stripe.elements({
    fonts: [
      {
        cssSrc: 'https://fonts.googleapis.com/css?family=Roboto',
      },
    ],
    // Stripe's examples are localized to specific languages, but if
    // you wish to have Elements automatically detect your user's locale,
    // use `locale: 'auto'` instead.
    locale: window.__exampleLocale
  });

  var card = elements.create('card', {
    iconStyle: 'solid',
    style: {
      base: {
        iconColor: '#c4f0ff',
        color: '#fff',
        fontWeight: 500,
        fontFamily: 'Roboto, Open Sans, Segoe UI, sans-serif',
        fontSize: '16px',
        fontSmoothing: 'antialiased',

        ':-webkit-autofill': {
          color: '#fce883',
        },
        '::placeholder': {
          color: '#87BBFD',
        },
      },
      invalid: {
        iconColor: '#FFC7EE',
        color: '#FFC7EE',
      },
    },
  });
  card.mount('#card');
2. Payment Request Button Element
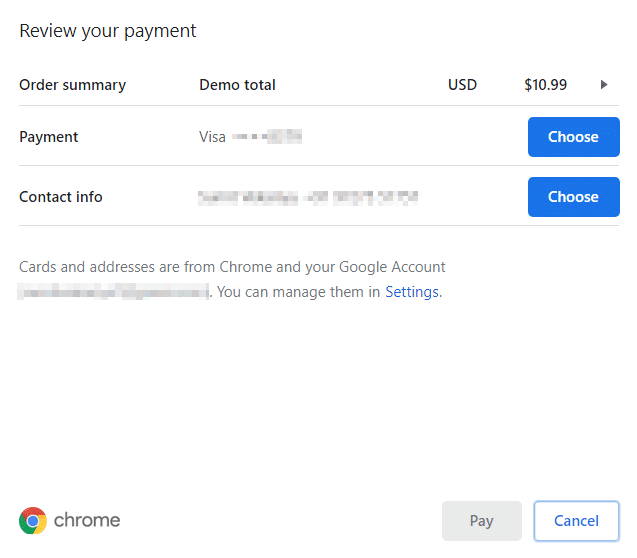
The Payment Request Button lets your customers check out with Apple Pay, Google Pay, Chrome saved cards, and Microsoft Pay.
Following below is the running demo with code to explore and play with.
Pen: https://codepen.io/sarkazein7/pen/WNoZpzd

Setup Stripe Elements (Client Side)
Elements is available as part of Stripe.js. Include this in your page and create a container that will be used for the paymentRequestButton Element:
<script src="https://js.stripe.com/v3/"></script>
<div id="payment-request-button">
  <!-- A Stripe Element will be inserted here. -->
</div>
Your Stripe publishable API key is also required as it identifies your website to Stripe:
const stripe = Stripe('pk_test_TYooMQauvdEDq54NiTphI7jx', {
  apiVersion: "2020-08-27",
});
Create a paymentRequestInstance (Client Side)
In this step, We will create an instance of stripe.paymentRequest with all required options, such as “country”, “total”, “currency” and etc.
This instance will be used to create the Payment Request Button
const paymentRequest = stripe.paymentRequest({
  country: 'US',
  currency: 'usd',
  total: {
    label: 'Demo total',
    amount: 1099,
  },
  requestPayerName: true,
  requestPayerEmail: true,
});
Mount the paymentRequestButton (Client Side)
In this step, We will check, that
const elements = stripe.elements();
const prButton = elements.create('paymentRequestButton', {
  paymentRequest,
});

(async () => {
  // Check the availability of the Payment Request API first.
  const result = await paymentRequest.canMakePayment();
  if (result) {
    prButton.mount('#payment-request-button');
  } else {
    document.getElementById('payment-request-button').style.display = 'none';
  }
})();
Create a PaymentIntent (Server Side)
In this step, We are going to Create a PaymentIntent on your server with an amount and currency.
Always decide how much to charge on the server side, a trusted environment, as opposed to the client. So that you can prevent malicious customers from being able to choose their own prices.
Following Code snippet is for node.js, You can use other frameworks as well.
// Set your secret key. Remember to switch to your live secret key in production!
// See your keys here: https://dashboard.stripe.com/account/apikeys
const Stripe = require('stripe');
const stripe = Stripe('sk_test_4eC39HqLyjWDarjtT1zdp7dc');

const paymentIntent = await stripe.paymentIntents.create({
  amount: 1099,
  currency: 'usd',
  // Verify your integration in this guide by including this parameter
  metadata: {integration_check: 'accept_a_payment'},
});
Included in the returned PaymentIntent is a client secret, which you’ll use to securely complete the payment process instead of passing the entire PaymentIntent object. Send the client secret back to the client to use in the next step.
Complete the payment (Client Side)
In this step, We will listen to the paymentmethod event to receive a PaymentMethod object.
Which can be used to perform the actions such as “Showing Error” or “Sending Email Notification”.
Later, Pass the PaymentMethod ID and the PaymentIntent’s client secret to stripe.confirmCardPayment to complete the payment.
paymentRequest.on('paymentmethod', async (ev) => {
  // Confirm the PaymentIntent without handling potential next actions (yet).
  const {paymentIntent, error: confirmError} = await stripe.confirmCardPayment(
    clientSecret,
    {payment_method: ev.paymentMethod.id},
    {handleActions: false}
  );

  if (confirmError) {
    // Report to the browser that the payment failed, prompting it to
    // re-show the payment interface, or show an error message and close
    // the payment interface.
    ev.complete('fail');
  } else {
    // Report to the browser that the confirmation was successful, prompting
    // it to close the browser payment method collection interface.
    ev.complete('success');
    // Check if the PaymentIntent requires any actions and if so let Stripe.js
    // handle the flow. If using an API version older than "2019-02-11" instead
    // instead check for: `paymentIntent.status === "requires_source_action"`.
    if (paymentIntent.status === "requires_action") {
      // Let Stripe.js handle the rest of the payment flow.
      const {error} = await stripe.confirmCardPayment(clientSecret);
      if (error) {
        // The payment failed -- ask your customer for a new payment method.
      } else {
        // The payment has succeeded.
      }
    } else {
      // The payment has succeeded.
    }
  }
});
Style the Button:
Stripe elements let you to change the look and feel of the element based on your choice of colors and fonts.
And to make that happen, You can pass few predefined parameters such as “type”, “theme” and “height” of the button.
Use the following parameters to customize the Element:
elements.create('paymentRequestButton', {
  paymentRequest,
  style: {
    paymentRequestButton: {
      type: 'default',
      // One of 'default', 'book', 'buy', or 'donate'
      // Defaults to 'default'

      theme: 'dark',
      // One of 'dark', 'light', or 'light-outline'
      // Defaults to 'dark'

      height: '64px',
      // Defaults to '40px'. The width is always '100%'.
    },
  },
});
Following is the running demo with code to explore and play with.
Pen: https://codepen.io/sarkazein7/pen/bGBoWvO

I hope that you have enjoyed reading this article. Feel free to share and add your valuable comments.
We at Unimedia are always eager to hear the opinions from people.